The Do Not Disturb sign is back on my door for the week. I have several commitments that need my attention, including a new website and blog. I am switching to Wordpress, and am absorbing every word in the Wordpress for Dummies book. If anyone has any Wordpress tips, stories or advice, I'd love to hear it all. It clearly is a beast that requires quite a bit of knowledge. I refuse to let Wordpress beat me! Lisa Sabin-Wilson is the writer of Wordpress for Dummies if you are interested in seeing her wonderful blog. From everything I read by Matt, the co-founder of Wordpress, I won't be disappointed by making the switch. I would love to personally sit with Matt, over a cup of coffee, to extract some of his best tips. Perhaps he would lighten up my mood with this change-over. Matt just might have a tip, or two for me, because I learned that a Wordpress blogger can be notified whenever anyone links up your blog. You never know, Matt might say he's in town this week :).
I will return next Tuesday, May 6th, where I will have a tutorial using Utee Ultra Thick and Perfect Pearls for you.
Sunday, April 27, 2008
Friday, April 25, 2008
Majestic Buck
Woohoo, it's the end of the week. What does that mean to me? Today, Donnie is off so we are heading over to Michigan for the day, and I can stamp all weekend long. Weekends are usually when I do my tutorial for Tuesday, but there are times I'm doing them at the very last minute on Monday. Want a hint about this Tuesday's tutorial? Make sure you have Ultra Thick Utee and Perfect Pearls ready.
This week I was able to participate in a couple of Splitcoast Stamper's challenges. This was Wednesday's sketch challenge. To see the sketch, click here. The complete gallery of sketches can be seen here.
I have to say that I think this is one of my favourite cards. I'm starting to use the brayer more, and the results are truly outstanding. The infamous Zindorf does amazing brayer work.
I hope you all have a wonderful, and restful, weekend. Thank you for stopping by.
Stamp: Penny Black
Ink: Adirondack Sailboat Blue, Tombow markers, Black Stazon, VersaMark
Paper: Buckaroo Blue, white, watercolour paper
Misc: Clear embossing powder, brayer
Wednesday, April 23, 2008
justjohanna Meets Daisyd
Good morning folks! Today I'm going to share some children's cards with you. Do you ever find yourself puzzled when it comes to creating these cards? I know I do. When I saw Daisyd's Wonder Years "Best Friends" cardstock chipboard, I decided that it would make a wonderful children's series. Stephanie is the artist who designed the Wonder Years line.
Here is a close up of the characters. They were coloured with pencil crayon and OMS, and Twinkling H2O's. Can you see the 3-D flowers I added to the dress? I love to embellish, as you probably know. All paper is Daisyd.
Combining stamps with stickers and chipboard opened a whole new world for me. My nieces and nephews will be delighted with these characters. justjohanna's stamps go well with Daisyd, wouldn't you agree? I think "they" think so too--just look at the smiles on their faces.
These trick or treaters are a little early, but that's okay; I always have goodies in my pantry all year round.
The next time you walk past cute characters, such as these, pick them up and try combining them with your stamps. It really does add that something special to a card.
Tutorial Tuesday - Tote
Welcome to Sunflowers and Dragonflies' weekly tutorial. I had several requests to share this tutorial with you, after I shared my class project last month. If you make a tote, please link me up because I would love to see it!
2" punch (or smaller)
4 small brads (for handles)
Score Pal or score blade
black marker (optional-for drawing on stitches)
Two large decorative buttons (for front pocket)
Double-sided tape (not shown)
Glue (not shown)
Cuttlebug (optional)
Cuttlebug templates (optional)
8 1/2" x 11" cardstock (tote) here blue
1 1/5" x 4 3/4" cardstock (side of tote) here white
6" x 3" cardstock (front pocket) here blue
2" x 3" cardstock (front pocket accent)here pink
6" x 1" cardstock (front pocket accent) here white
2 - 1/2" x 11 1/2" cardstock (handle)here white
2 - 2" circles from punch (front pocket) here pink
2 - 2" circles from punch (front pocket) here white
2 - 2" half circles from punch (front pocket) here blue
This photo is to aid you with your cuts.
This photo is to aid you in your cuts.
This is a diagram of your score, and cut, lines. Vertical score from outside edge to inside is
1 1/4". Horizontal score lines are 4 3/4" from top and bottom ends.
Go ahead and score your vertical lines 1 1/4" from outside edges inwards.
Place your paper horizontally and score your horizontal lines 4 3/4" from outside edge, inwards. Do this from the left hand side, and the right.
Now you will clip just a tiny portion of your score line. Snip the score line only to the 1 3/4" from the edges. Do not cut the piece off.
Place double-sided tape down the left and right margins, on one side only.
Fold up the clipped edge and wrap the outside edges around each other to create the sides of the tote.
Place your 2" x 3" decorative accents through the Cuttlebug (optional) and glue to the front 6" x 3" pocket, as shown.
Score the 6" x 1" decorative accent down the centre and glue on the top edge of your pocket, as shown.
Run your bottom corners through the Cuttlebug (optional). Place on the bottom edges of the front pocket, as shown.
Turn your pocket over and cut overlapping edges of circle.
Run half circle through Cuttlebug (optional) and adhere onto bottom circle, as shown.
Place decorative buttons onto front flaps, as seen here, and adhere flaps to front pocket with double sided tape. Add stitch lines, if you wish.
Adhere sides to tote. You may wish to run your cardstock through the Cuttlebug before adhering.
It is possible to give your handles a decorative touch with the Cuttlebug. Place your strip into the template, as shown, and reverse the strip and run it through the Cuttlebug, once again. If your handle is too long for the decorative template to meet the pattern in the centre, trim a little bit off your end.
Attach your handles with small brads.
Here you can see that I added two white paper buttons on the front pocket. I placed my white paper through the Cuttlebug with a circular template, and used a hole-punch to punch out two of the circles, and adhered as buttons.
You can create a coordinating 3" x 3" gift card and place it in the front pocket.
This is a quick, and easy, tote. Have fun creating yours!
Tuesday, April 22, 2008
Earth Day Celebration Winner
Congratulations NOEL. You are the winner in the Earth Day celebrations. Please give me your address and the 2008 Earth Day stamp is yours. Thank you for participating.
Monday, April 21, 2008
justjohanna Earth Day cards
Holy smokes, yesterday was a very busy, and fun, day. I played all day with the Earth Day challenges over at justjohanna. Today's card reflects Kim's challenge to use newspaper on our cards.
Do you recognize my polished stone background? The paper behind the peacock uses the shaving cream technique. The peacock was stamped twice: once on white paper and once on the polished stone background. Each feather was then cut out and glued onto the white paper. Twinkling H2O's were painted around the peacock.
Flower stems were stamped onto the newspaper.
Can you guess what Teresa's challenge was? It was to use earth colours, and since most of my clothes are earth tones, I thought I'd stick with what I like best--rust and brown.
Here I combined Phillipa's eat fresh technique and Teresa's earth colour techniques. Used lots of layers and had fun adding lots of black dots. The tractor was mounted onto rust paper, cut out, and then pop dots were added to the tractor.
All images are justjohanna.
Saturday, April 19, 2008
Earth Day Celebrations Starting
This post is staying at the top of today's post. Scroll down to see the numerous posts that are taking place today.
Kick up those heels--Earth Day Celebrations have begun. I'm heading over to the justjohanna forum now, to play in the challenges.
My challenge is to reuse tin foil lids from containers such as coffee and yogart. Examples are posted below.
Remember, participate in my challenge, and link me to your card (you are encouraged to upload it to the justjohanna Earth Day gallery), and your name will be submitted for the grand prize of $250. You have until midnight my time (Detroit/Toronto).
(no idea why this is an odd colour and is underlined. Pretend it isn't please).
I have a nephew that's going to love receiving this recycled card for his birthday; he played the lead part in his school play entitled, "Pirates of Penzance." What a talented young man he is!
Do you recognize the clouds and waves as being recycled tinfoil freshness seals? Yup, they come from yogart and coffee containers. Of course I had to use my Cuttlebug to embellish the tinfoil. These justjohanna images make perfect sea-bearing animals, don't you think?
Somehow, "Tree on a Hill" seems to be the appropriate name for this card. It would be a lonely looking tree but the justjohanna animals know that everyone and everything needs a friend. Shh, they are really tree-huggers in disquise.
Twinkle, Twinkle, Little Star
How I wonder where you are
It looks like this cute little owl found out where the star was hiding after all--it was close to the moon. If only we knew that as a child, perhaps we could have swung on a star too!
Kick up those heels--Earth Day Celebrations have begun. I'm heading over to the justjohanna forum now, to play in the challenges.
My challenge is to reuse tin foil lids from containers such as coffee and yogart. Examples are posted below.
Remember, participate in my challenge, and link me to your card (you are encouraged to upload it to the justjohanna Earth Day gallery), and your name will be submitted for the grand prize of $250. You have until midnight my time (Detroit/Toronto).
PRIZES PRIZES PRIZES
One (1) grand prize of a $250 justjohanna shopping spree.
One (1) second prize of a $50 justjohanna gift certificate.
Five (5) third prizes of 25% off coupons for the justjohanna online store.
One (1) limited edition Al in Space rubber stamp for the winner of each of the individual challenges.
GOOD LUCK TO EVERYONE!
(no idea why this is an odd colour and is underlined. Pretend it isn't please).
I have a nephew that's going to love receiving this recycled card for his birthday; he played the lead part in his school play entitled, "Pirates of Penzance." What a talented young man he is!
Do you recognize the clouds and waves as being recycled tinfoil freshness seals? Yup, they come from yogart and coffee containers. Of course I had to use my Cuttlebug to embellish the tinfoil. These justjohanna images make perfect sea-bearing animals, don't you think?
Somehow, "Tree on a Hill" seems to be the appropriate name for this card. It would be a lonely looking tree but the justjohanna animals know that everyone and everything needs a friend. Shh, they are really tree-huggers in disquise.
Twinkle, Twinkle, Little Star
How I wonder where you are
It looks like this cute little owl found out where the star was hiding after all--it was close to the moon. If only we knew that as a child, perhaps we could have swung on a star too!
Can you tell what Kim H. challenged us to recycle? Yup, it's a paper bag. This image came prestamped on a shopping bag from a rubber stamp store. I decorated the edges of this card with one of my favourite justjohanna stamps.
In my next card, I glued on torn pieces of the paper bag onto a 4" x 5 1/4" piece of brown paper bag. Next, I decorated the paper with acrylic paint and rubber stamps. All images are justjohanna.
Rina's posted challenge is to create flowers with recycled materials. What is better than magazines for this one! I used a hole punch to punch out the flowers and then drew stems with a permanent marker. Leaves and birds are justjohanna stamps. Twinkling H2O's were used to paint the grass and clouds.
Remember the song, "Let's Go Fly A Kite" that we sang as kids? Well, that's just what justjohanna's birds are doing today, thanks to Godelieve's challenge, "Earth, Wind, Fire"
Stamps: justjohanna
Colour medium: Prismacolour pencil crayons, Twinkling H2O's
Earth Day - Reuse Coffee Sleeves
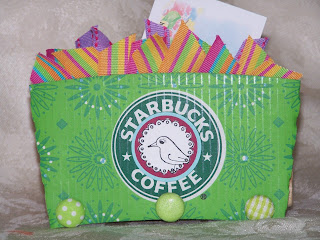
Emilia's challenge is to reuse coffee sleeves. I just happen to have some on hand, so I turned mine into a gift card holder.
What will you do with yours?
Friday, April 18, 2008
Earth Day Celebrations
Two posts in one day? Yah!
Earth Day is almost here. Think Green is a common phrase now-a-days. My daughter is a real tree hugger and keeps me in check about earth day awareness. Right now she is working very hard in trying to direct me to purchase cloth grocery bags. If more people were like her, our earth would be beautiful for generations to come.
To make us a little more aware of what earth day is all about, justjohanna has a lot of activities planned. When and How? Start by visiting the justjohanna message board tomorrow morning, and participate in the challenges from the design team. Each participant who uploads a card to the gallery, or to their blog, with a link to justjohanna, will have their name entered into the big draw.
I will be live from 2:00 to 3:00, Detroit/Toronto, time on my blog. I will be available to interact with you should you have any questions concerning the earth day events.
Don't forget to check in with me tomorrow.
Stamps: justjohanna Paper: Paper Studio
Prismacolour pencil crayons and OMS
Birds of a Feather.
Good morning! Today's image created a wonderful challenge for me, and I learned a lot while researching the colours of birds. I'm sure you know how we are losing our rainforests, but did you know that we are losing 137 birds, plants, and insect species very single day? There are so many interesting statistics out there, and so many web sites dedicated to the deforestation of rain forests.
On a more positive note, these birds have been coloured with Prismacolour pencil crayons and blended with OMS. These are their true colours.
This is the stamp that I used. The wooden block is 5" x 6" and is from Coronado Island Stamps. The name of this stamp is Birds of a Feather. Image was stamped onto SU white cardstock because it produced the best results, as it is such a detailed stamp. Because I wanted to use my Tombow markers, I stamped this image onto two different weights of watercolour paper without success. I then used a low quality white paper without getting the results I was looking for. SU white cardstock is heavy and very smooth. Perfect for this stamp!
Enjoy your day, and thanks for stopping by!
On a more positive note, these birds have been coloured with Prismacolour pencil crayons and blended with OMS. These are their true colours.
This is the stamp that I used. The wooden block is 5" x 6" and is from Coronado Island Stamps. The name of this stamp is Birds of a Feather. Image was stamped onto SU white cardstock because it produced the best results, as it is such a detailed stamp. Because I wanted to use my Tombow markers, I stamped this image onto two different weights of watercolour paper without success. I then used a low quality white paper without getting the results I was looking for. SU white cardstock is heavy and very smooth. Perfect for this stamp!
Enjoy your day, and thanks for stopping by!
Thursday, April 17, 2008
Double Take Thursday - MFT
Hey, it's double take Thursday again. Boy did that come fast! Kim challenged me to use a stamp from My Favourite Things. This is still my all time favourite stamp that they carry. Don't forget to peak at Kim's creative card.
Thanks for playing Kim.
Wednesday, April 16, 2008
Arte Y Pico and You Cheer Me Up Awards
Lucky me, I've been awarded the Arte Y Pico Award by Shirley and Kim Prince. Malieta recently presented me with the You Cheer Me Up Award as well. Thank you ladies, for your generous gift. I cannot reproduce the picture of Malieta's award as she has it saved as a GIF file. Sorry ladies.
There is loads of talent out there. There are so many readers and subscribers who visit every day, and deserve this award too. Please consider yourself awarded and share in the fun with your bloggers.
Subscribe to:
Posts (Atom)